
Distressed Wood Finish
|
The above clip is a short, non narrated video of Framer Rob Distressing a beam.
He begins by pounding and scraping it with stones, then moves on to chisels, grinders, an axe, and adding worm holes. 
The posts on this project were slightly different than the beam.
We used a chain saw, grinder, sander, framing axe, screw, and thermal mug of tea. The tea being used to wash the sawdust out of our throats. 
The rough shaping was done with a chain saw. We changed angles frequently to help achieve the hand scraped look in the final product. 
Next, we smoothed it out with an angle grinder with a 60 grit sanding paddle, creating a wavy texture, reminiscent of very old, hand hewn timbers. Some of the deeper chain saw marks were left for character. 
A random orbital sander was used to take the burrs off that the grinder left. 
The framing axe provided the deeper hand hewn markings. 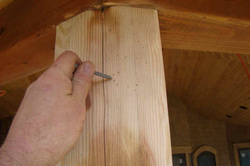
We used a screw to create worm holes in the wood.
As of this writing the stain is not yet complete, but the posts will have a brown stain with a darker glaze to pick out the highlights.
|